
Shrinking a 20TB Virtual Disk Formatted With ReFS


Let us start with a bit of backstory before we dive into the "how to" portion shall we?
In the early days of using Veeam, the original backup and replication server I started with was a bare metal/physical server. The primary repository had a capacity of 20TB of usable space and my clients were barely using any of it at the time. Fast forward a few years and I was approaching 16TB of that storage consumed and it was looking like there was no end in sight for growth, so I needed to find a replacement solution. While there were tons of options available, what I chose to go with (for better or worse) was a server which had over 5 times the storage capacity as the original. But, this time I intended to use it as a hypervisor to pull double duty and make storage management of backups a bit easier to deal with... or so I thought at the time...and I was more or less right in the end.
Rather than stand up a new Veeam Backup & Replication server and start all over... and in doing so leave the existing server in service while backups aged off over the next two years... I chose to instead do a Physical-to-Virtual (P2V) conversion of the old/original server. I've done this dozens of times before using the Veeam Agent for Windows... Just never on anything quite so large before. But... Like so many other conversions... It worked like a charm. I took a backup of the server, stood up a fresh VM on the new hypervisor and did a restore. Boom! Other than the amount of time it took because of the sheer mountain of data being moved... everything worked fantastic. 😃
📌Side Note: I could have also simply moved the backup files over to the new server, but in doing so it would have lost all the ReFS block cloning benefits. While I did have enough available space to accommodate re-hydrating all the files, the thought of consuming roughly 60% of the new servers capacity right out of the gate was not appealing. Anyway... I digress...
With the P2V conversion out of the way, over the next few months each client was slowly transitioned over to using their own dedicated repositories... each residing on their own virtual disk. One advantage of this was that I found it was much easier to seed a repository for a new client during the onboarding process (trying to push 3TB of client data out of a 10Mbps DSL Internet connection is just not practical). This transition also significantly reduced the amount of data consumed on the original 20TB volume as short term retention policies quickly freed up a lot of space. The longer GFS retention settings however meant that there was still a substantial amount of data remaining on that volume.
Having freed up over 6TB of space (leaving me with ~10TB) I was eager to reclaim some of that space by trying to shrink and compact the virtual drive. With a volume formatted with NTFS, the process would have been quite simple... Defrag the drive to push the contents to one end of the volume, shrink the volume, then shrink or compact the virtual disk using any number of available methods. You don't really need to go through all of that just to shrink the virtual disk... but it does help from a house keeping perspective and it also prevents the drive from inadvertently growing back up to an unruly size. Drives formatted with ReFS are however limited to only being expanded... you cannot shrink an ReFS volume (at least not that I've ever discovered). I set out to do the other usual steps without first shrinking the volume and quickly ran into trouble. None of my usual methods of shrinking were working (I tried about 5 different methods with very limited success)... I was seemingly stuck with a +16TB virtual disk even though I was only consuming just under 10TB. But.. all hope was not lost... SDelete to the rescue!
The main problem I was having is that there was still non-zeroed data in the clusters on the virtual volume. With a non-zero value present, the compacting tools were refusing to free up any significant amount of space. (I did manage to recover about 1TB of space with my normal methods... but not the expected +6TB of space I was hoping for). As luck would have it though, the Microsoft Sysinternals team has a product called SDelete that can write zeros to all the free space on a volume to alleviate that issue. After using SDelete, I was able to compact the virtual disk down to about 10TB. All was good with the world.
Fast forward and now there is hardly any data remaining on the drive (relatively speaking). Due to aging of backups, manually moving some remaining backups to another volume, and just manual deletions in general, only ~1TB remains... and this remaining data is projected to stick around for the foreseeable future. So... Time for another shrinking session to free up another 9TB of space! I've learned a few extra tricks along the way and here's how I went about doing this latest one...
⏰Backing up a bit though, I actually started this process off with ~3TB of data... I'll explain a bit more on that in a minute.
I started off by moving the the 10TB virtual disk to a new storage pool. This was done as a live migration to avoid any downtime. The migration took the better part of a day. Once moved, I ran SDelete to zero out all the free space. In this case running "sdelete64.exe -z d:" was the magic command of the day. I then spent the next half day watching the 20TB volume completely fill to 100%.
 |
| Drive Full |
But... don't panic... the virtual drive does not expand at this point. Because it's all zeros being written, the underlying virtual disk didn't budge in size. It stayed at 10TB the whole time. The zero data that SDelete is generating is written to a hidden file at the root of the volume. As soon as the volume hits 100% capacity, that file is deleted and the actual used space is once again properly reported (in my case just under 3TB). The second phase of SDelete is to purge the MFT files. This is where things get a bit weird. There's been a known bug in SDelete v2.x whereby the percent complete does not always report properly. And, in my case... by a LARGE amount...

Nothing quite like having a reported 1 BILLION percent complete! 😂 I'm not sure if this is something with the how SDelete interacts with this particular version of Windows Server (Server 2016), the version of ReFS version (ReFS version 3.1), an issue with it being such a large volume, something with it being on a virtual disk... the fact that SDelete was originally created to work with NTFS volumes (more on that later)... I just don't know to be honest. I just know it's been reported as an issue by many different people for a few years now and seems to remain a problem as of SDelete version 2.04.
Anyway, during this purge process you'll notice that the drive volume grows once again. This is due to the hidden file once again at the root of the volume (SDELMFT000000) which as of the above screenshot had already consumed over 1.5TB of space. It also took what was feeling like forever to do the MFT purge. Whereas it only took a shade over 7 hours to write all the zero data for the drive in the first phase... the MFT file purge writes much slower to the disk and as such was on track for taking 160 hours (over 6 days) to finish this second phase.😲 (I'm sure it doesn't help that this virtual disk sits on mirrored pool of spinning rusty metal if you haven't already jumped to that conclusion).
Several people have reported it was OK to let this second phase finish. But, I was growing impatient and killed the process with CTRL+C which cleanly closed the program and removed the hidden file it was creating. The reason I killed SDelete is that ReFS does not have a traditional MFT like NTFS. According to the software's documentation, what this phase is attempting to do is write files small enough that the data is stored within the MFT itself rather than written out to disk somewhere with a reference in the MFT. So, this phase... to the best of my knowledge... should be omitted from drives formatted with ReFS (again, SDelete was written for NTFS, not ReFS volumes). On an ReFS volume, if this phase is left to run to completion, it seems to simply re-zero the volume again, only this time much slower because it's doing so with very tiny file writes. With SDelete finished doing it's magic the virtual drive is still at the same 10TB it started at... but don't fret... it's magic time!
With zeroing the free space complete, I did another live migration of the virtual drive back to its original storage location. The migration back was significantly faster... correction... "shorter"... because the only thing being moved is the actual data consumed at this point. All the free space, having been zeroed out, is ignored. Thus, in doing the move, the drive was auto-magically compacted and my final virtual disk size was reported at just over 3TB... Ok... So... Not really. It only shrunk it down to 7TB. 😞 And here's the reason why...
When data is written to a volume it is written to a "cluster" in the volume. That cluster has a fixed size associated with it. For NTFS and ReFS formatted volumes the default cluster size is 4kB. This size is set when you format the drive and cannot (to my knowledge) be changed thereafter. Here's an example of selecting the two cluster size options (shown as "Allocation unit size") for ReFS via the Windows Explorer drive format GUI, as well as an example of using the Disk Manager wizard showing the 8 (yes eight!) cluster size options available when formatting a volume with NTFS.
 |
| ReFS Cluster Options |
 |
| NTFS Cluster Options |
However, when I formatted this volume, per recommendations from Veeam, I formatted it with a cluster size of 64kB. Why does any of this matter? Well... if data is written to the cluster, but the cluster isn't full, the cluster still has to be tracked by the underlying VHDX file regardless of how full it is. This means that if even so much as 1kB of data is written into the cluster, the VHDX has to account for and track 63kB of empty space. Here's a perfect example of a text document with only six lines of text and is stored on a volume formatted with 64kB cluster size...
 |
| File Properties |
This empty space in the cluster is called "Slack Space" and has been used by crafty hackers to store bits of malicious code.

This particular drive I knew was heavily fragmented from many years of use and it wasn't entirely surprising to know that I had over double the volume consumed in part because of having to track partially filled clusters (it wasn't the only contributor of course). I've used the Windows Defrag tool on the drive, but if I'm being honest... using the Windows Defrag tool is basically just a way of checking the box so you can tell your manager "yes, I defragmented the drive"... but it really doesn't do that fantastic of a job IMHO. So... not being completely happy with my initial space savings, I set out to "properly" defragment the volume to combine the clusters. The sad story of which was in my previous post "Lessons Learned In Pain: Disk Defragmentation"... So, I'll let you read that rather than rehashing it all again here. But, the short version of my initial defragmentation attempt was that it was an utter failure. The defrag program I used didn't know how to deal with Block Cloning and it re-hydrated all my backups bloating them up to roughly 6TB, and because of moving data around on the drive during the defrag process... it expanded out the VHDX file to just over 12TB! 😵 (talk about one step forward, two steps back!)
Being more than a little disgruntled about the drive having lost its block cloning benefits, I moved over a bunch of backups to their own volume to let them age off in another location. What I was left with was 1.1TB data that will stick around for the foreseeable future until the serve is decommissioned. So, I took another swing at defragmenting the drive. Now, the slack space as noted before is one reason the drive didn't shrink as far as it could/should have. Another reason is that the data was fragmented and scattered all over the drive meaning that there weren't large segments of zeroed data. Take for instance these two pictures here...
 |
| Fragmented Data Storage |
 |
| Contiguous Data Storage |
Even though the clusters are full in the first picture, there are segments in between that are empty. Now, it is to my understanding (I'm happy to be told I'm wrong) that those empty clusters have an entry for them too, and that entry is fairly small. But, the entry made is for a range of clusters, not just a cluster by cluster entry. So, if you have a large contiguous range of clusters, there would be a single entry for all of them in a row (e.g. clusters "30-35", rather than, "30, 31, 32, 33, 34, 35"), but, if you had the same number of clusters split into ten regions, then there would be ten entries to account for those ranges of clusters. As I understand it (again, I'm not a storage system engineer), these entries aren't anywhere nearly as significant as the issue surrounding partially filled clusters and slack space, but it apparently exists as part of the equation all the same. I've also read in a few places that if the empty clusters are few in number between two clusters filled with data, that rather than being flagged as empty, they'll be accounted for just as if they did hold data. Whatever the true story is, my personal experience has shown that it impacts being able to compress the drive.
So, with that in mind, I told the defrag utility to pack all the clusters sequentially, sorting the data by file names, which shoves them all to the front end of the volume, both minimizing slack space and maximizing contiguous clusters of real and empty data. I then waited patiently for another 20+ hours for the volume to be defragmented (I hate waiting). Here's the visual representation of cluster placement before and after the defrag...
 |
| Defrag Report |
And, for what it's worth, one of the files that was listed in the pre-defrag analysis report was for an old company laptop, the backup file of which was only 190GB in size, but had a reported 17,002 fragments! 😝 Like I said... it was an old volume... and the native Windows Defrag didn't do much to ever help that volume stay clean. 🤷
📌Side Note/Tangent: Where I have found smashing all the data down to the front end of the volume has been most important for me has been when shrinking an NTFS volume (I'm talking about the actual volume, be it stored on a physical or virtual drive). The reason being is that you can only shrink the volume down to the last cluster that has data stored in it. If that cluser is near the end of the volume, you won't be able to shrink it very far. A small handful of partition manager applications will proactively move data for you prior to shrinking... but most wont. So, I always suggest using a good defrag tool like O&O Defrag to clean up the space before attempting to shrink a volume. As for "when/why do you shrink a volume?"... it is most often times done when I clone an HDD drive to an SSD drive and the HDD is significantly larger than the SSD. One could very easily argue that defrag is most important when optimizing the performance of an HDD (which is why it was developed in the first place), but I tend to convert more systems to SSD rather than leave them running on HDDs if I can help it. On with the story...
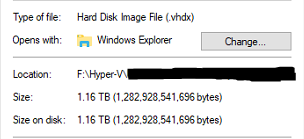
So, with the drive finally defragmented I once again ran through the same process as before... I ran the same SDelete command as before. This time I canceled it as soon as it hit the second phase where it tries to zero the MFT. And, like before, I migrated the drive which did the auto-magic compression... and BOOM! the end result was a 1.1TB VHDX file! 😁 Which if you are keeping tabs on the story from beginning to end... it means I went from 10TB down to 7TB up to 12TB and finally down to 1.1TB for a total reclaimed space of 9TB! 🤣🤣 And... the whole time I did all of this I had zero system downtime. 😉
 |
| Before Migration |
 |
| After Migration |
👮Disclaimers: Now, I'll say this much... While I did do this all live with zero down time, I wouldn't say that's a wise choice for everyone. I got away with doing it live mainly because the contents of the drive are stale at this point and no user data was being read from the drive much less written to the drive during this process. I would not recommend doing this live on a drive that had any significant amount user data access for fear of potential corruption or crashing of an application trying to write to disk. As was noted, the defrag program I chose was a horribly wrong choice due to it not knowing how to deal with block cloning and thus killing my storage savings... so pick a different defrag program. But, if you aren't using block cloning on your volume... O&O Defrag is a good program in all other respects! Additionally, SDelete was written to work with NTFS and nobody from the dev team (to my knowledge) has ever reported that it is actually safe or compatible for use with ReFS. The only confirmation that it's "safe" are the dozens if not hundreds of users who've said they've used it without issues other than noted above. That said... your mileage may vary! And, a final note... although the underlying VHDX file was successfully reduced in size, the ReFS volume was not... it's still 20TB... and since ReFS doesn't support drive quotas, there's nothing explicitly in place to prevent data from being written to the drive and causing it to bloat back up again... potentially all the way up to it's full 20TB capacity!
As a point of observation, here's the Disk Throughput on the hypervisor during the 1) zeroing process with SDelete, 2) migration of the 1.1TB of data between the temp drive and the production environment, 3) the completion of the migration of the zeroed out data... essentially the compacting of the VHDX file where Hyper-V was still transferring the drive, but all it was actually doing was reading zeros and not writing anything to the new VHDX file.
 |
| Disk Throughput |
Anyway... that was my adventure in shrinking a 20TB virtual disk formatted with ReFS. The completion of the task at hand was only partially successful since using O&O Defrag killed the block cloning savings offered by ReFS. With the release of Veeam 12 around the corner, we should hopefully be getting the ability to migrate backups from one repository to another while maintaining ReFS/XFS block cloning benefits! 😍 Being able to stand up a new repo and move backups without losing block cloning would have rendered this whole adventure moot... I would have simply migrated and blown away the old repo. That said, this is still a good IT nugget to keep in your back pocket in case you need this to shrink a storage volume.
Note: Post migrated from old Blogger website.